Brook Business: Powering Your Own Branded Client
Updated at: 2025-08-23
The prerequisite of this article is that you are already a Brook Business or Brook Business Plus subscriber. Then you can obtain your CLI Token from your account. In the following text, we assume your CLI Token is xxx.
Brook Business provides three combinations of usage:
First Combination
- Your User System
- If you have strong development skills:
- You can develop your own User System based on the User System documentation.
- If you don’t have development skills:
- You can use brook-store, an existing implementation of a User System.
- Register, log in, add Brook Servers, monitor user traffic, manually renew subscriptions and add traffic for users. Online payment is also supported, but requires minimal custom development.
- If you have strong development skills:
- Your Brook Servers
- Run your own Brook Servers, specifying your CLI Token.
- Our Brook Client
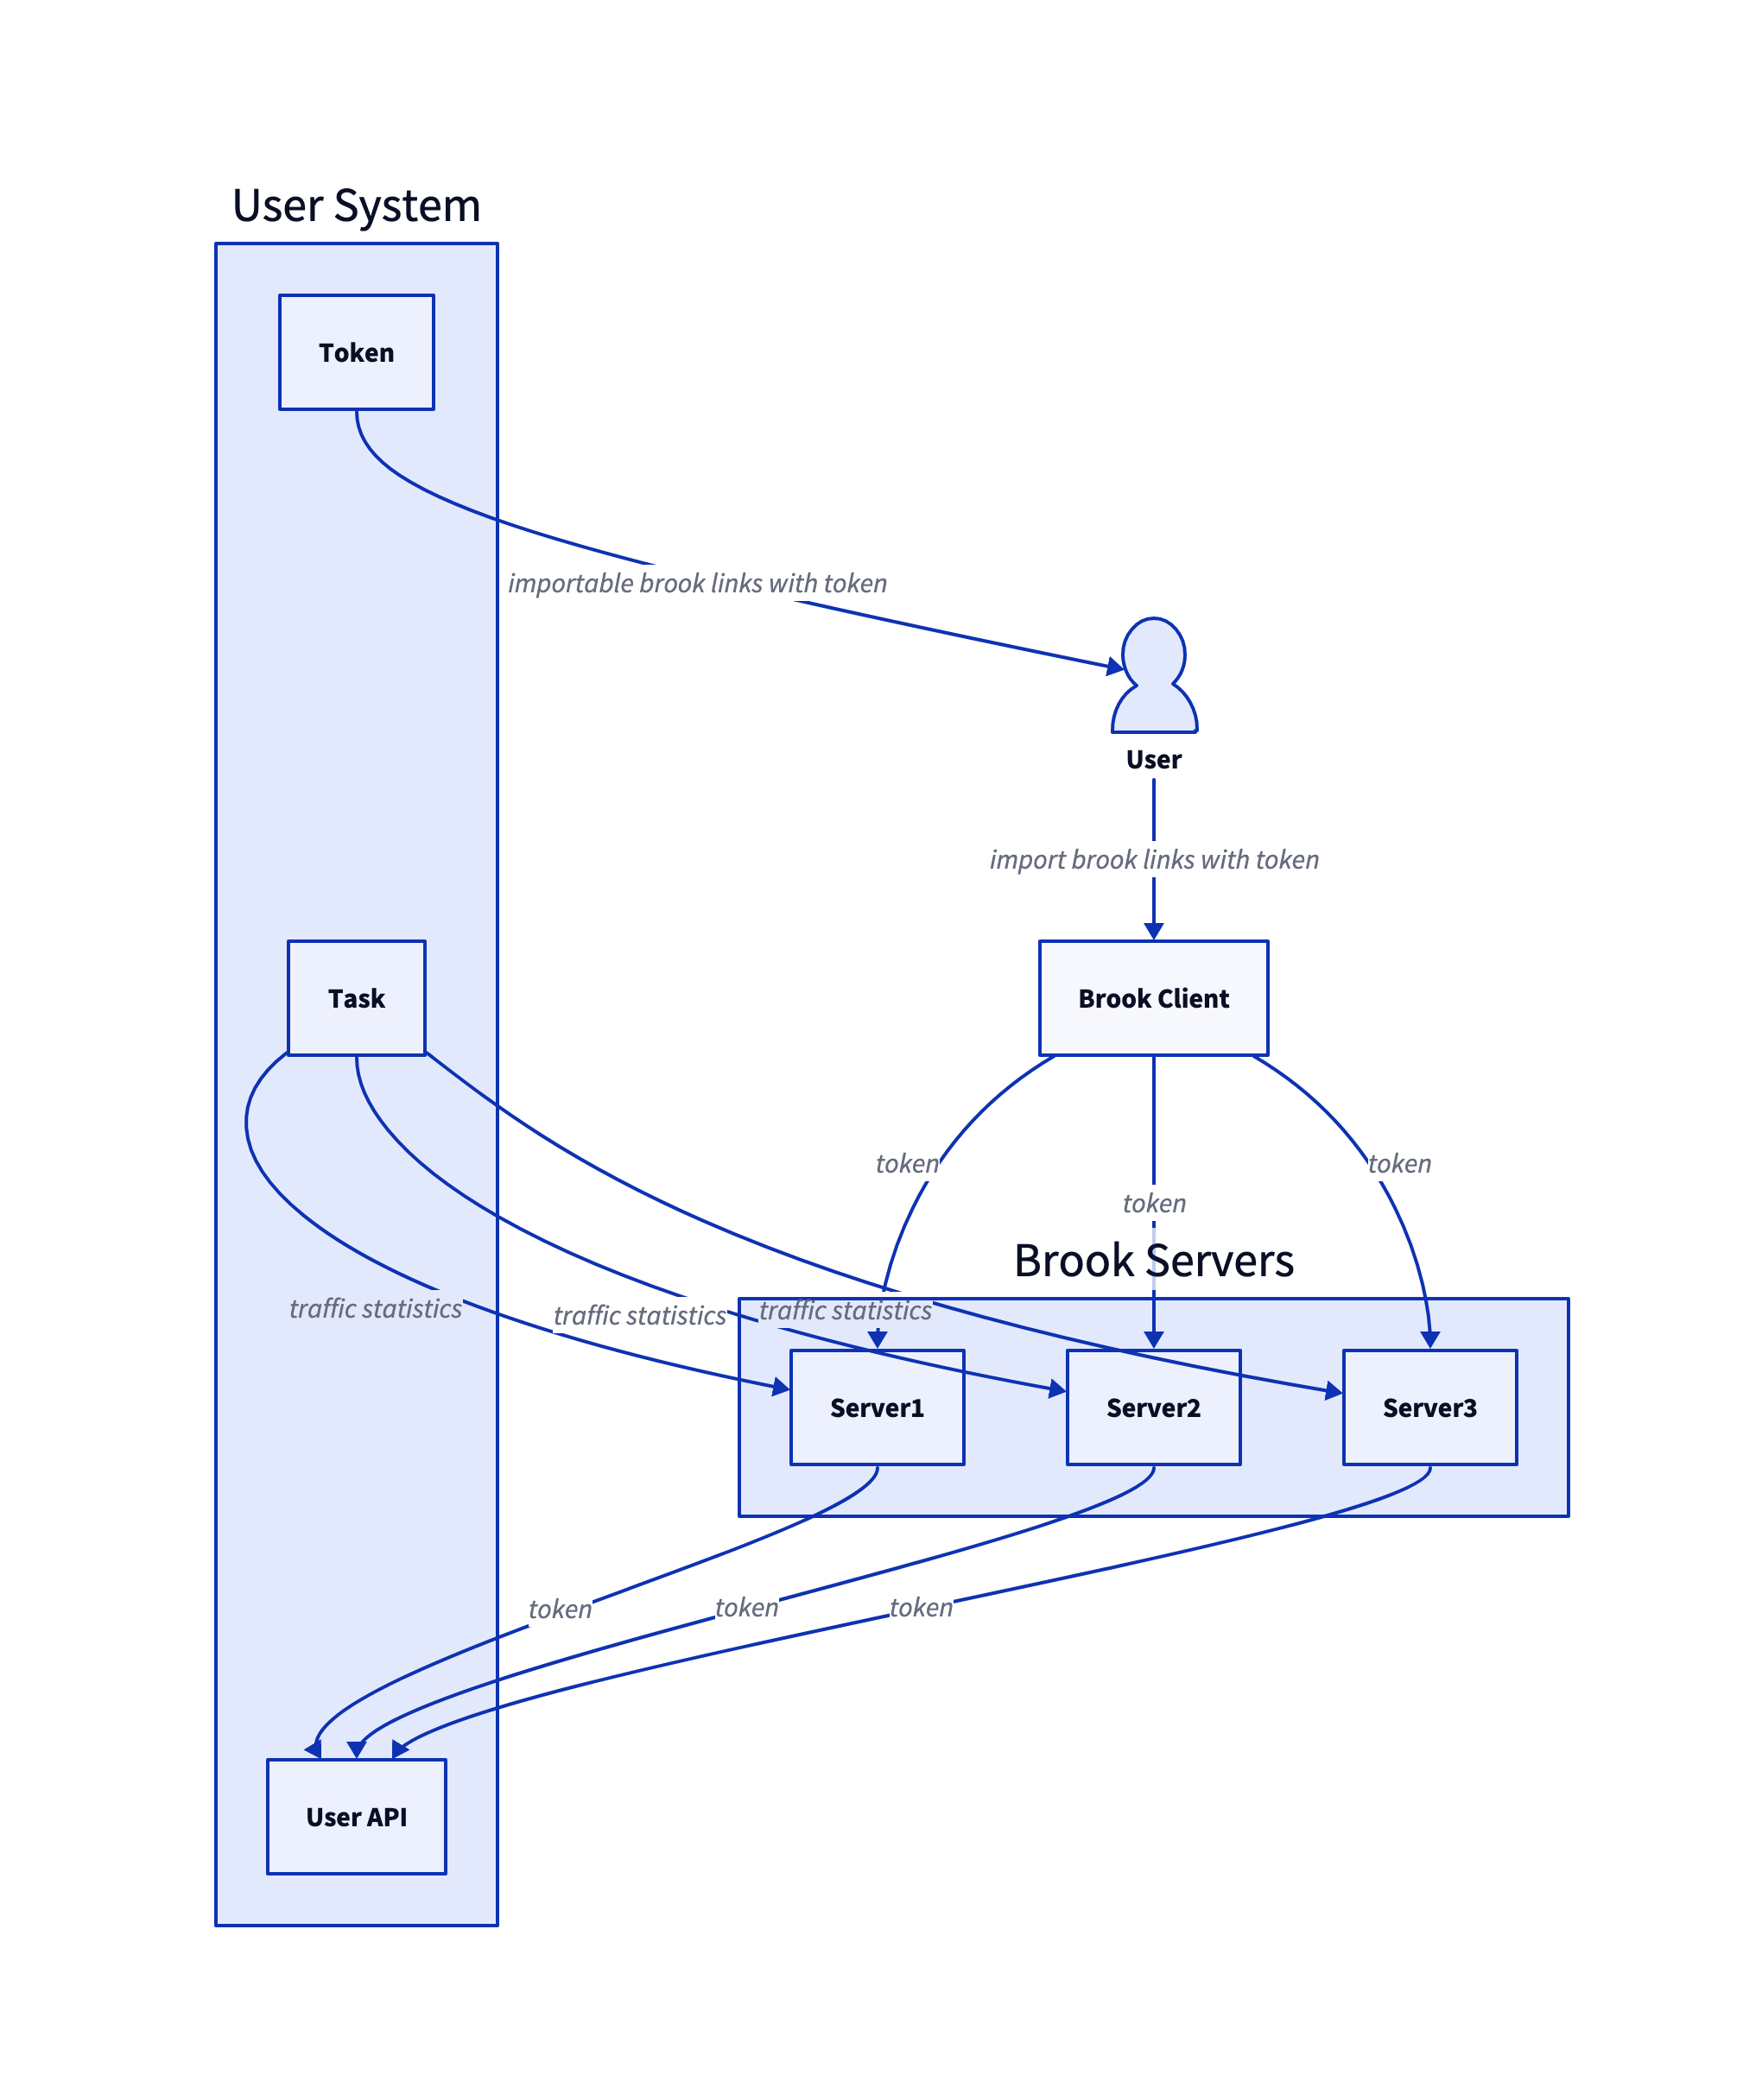
Your Basic Workflow
- Deploy your User System
- Suppose your deployed User System provides a userAPI URL like
https://your-user-system.com/yyy
- Suppose your deployed User System provides a userAPI URL like
- Deploy your Brook Server. It is recommended to run as root user
brook --cliToken xxx --pid /server.pid --userLog /server.log --userAPI https://your-user-system.com/yyy server -l :9999 -p hello - Generate a brook link for your deployed Brook Server. Assume the deployed Brook Server IP is
1.2.3.4brook link -s 1.2.3.4:9999 -p hello --name "just a name" - Log in to your User System’s admin panel, and add the brook link generated above to your User System.
Repeat steps 2–4 to add more Brook Servers.
Your Users’ Basic Workflow
- Users visit your User System, register, and log in.
- Users purchase your service online.
- If your User System doesn’t support online payments, you can manually renew subscriptions and add traffic in the admin panel.
- Users see their personal importable
URL. - Users open our Brook Client and import the
URLabove to add servers.- Our Brook Client requires Email verification at first use. This Email is independent of your User System.
Second Combination
- Your User System
- If you have strong development skills:
- You can develop your own User System based on the User System documentation.
- If you don’t have development skills:
- You can use brook-store, an out‑of‑the‑box User System.
- Register, log in, add Brook Servers, monitor traffic, manually renew subscriptions and add traffic. Online payments are supported but require limited development.
- If you have strong development skills:
- Your Brook Servers
- Run your own Brook Servers, specifying your CLI Token.
- Your Customized Brook Client
- A customized branded client is an additional service of Brook Business, requiring a one‑time extra payment. See details
Your Basic Workflow
- Deploy your User System
- Suppose your deployed User System provides a userAPI URL like
https://your-user-system.com/yyy
- Suppose your deployed User System provides a userAPI URL like
- Deploy your Brook Server
brook --cliToken xxx --pid /server.pid --userLog /server.log --userAPI https://your-user-system.com/yyy server -l :9999 -p hello - Generate a brook link for your deployed Brook Server. Assume the deployed Brook Server IP is
1.2.3.4brook link -s 1.2.3.4:9999 -p hello --name "just a name" - Log in to your User System’s admin panel, and add the brook link generated above to your User System.
Repeat steps 2–4 to add more Brook Servers.
Your Users’ Basic Workflow
- Users visit your User System, register, and log in.
- Users purchase your service online.
- If your User System does not support online payment, you can manually renew and add traffic for users.
- Users see their personal importable
URL. - Users open your customized Brook Client and import the
URLabove to add servers.- Users don’t need additional Email verification. They can directly import after opening the client.
Third Combination
- Your User System
- If you have strong development skills:
- You can develop your own User System based on the User System documentation.
- If you don’t have development skills:
- You can use brook-store, an existing User System implementation.
- Register, log in, add Brook Servers, check traffic, manually renew subscriptions and add traffic. Online payments are supported but require minimal development.
- If you have strong development skills:
- Your Brook Servers
- Run your own Brook Servers, specifying your CLI Token.
- Your Customized Brook Plus Client
- A customized branded Plus Client is an additional service of Brook Business Plus, requiring a one‑time payment. See details
Your Basic Workflow
- Deploy your User System
- Suppose your deployed User System provides a userAPI URL like
https://your-user-system.com/yyy
- Suppose your deployed User System provides a userAPI URL like
- Deploy your Brook Server
brook --cliToken xxx --pid /server.pid --userLog /server.log --userAPI https://your-user-system.com/yyy server -l :9999 -p hello - Generate a brook link for your deployed Brook Server. Assume the deployed Brook Server IP is
1.2.3.4brook link -s 1.2.3.4:9999 -p hello --name "just a name" - Log in to your User System’s admin panel, and add the brook link generated above to your User System.
Repeat steps 2–4 to add more Brook Servers.
Your Users’ Basic Workflow
- Users visit your User System, register, and log in.
- Users purchase your service online.
- If your User System does not support online payment, you can manually renew and add traffic for users.
- Users see their personal importable
URL. - Users open your customized Brook Plus Client and import the
URLabove to add servers.- Users don’t need additional Email verification. They can directly import after opening the client.